Create, Experiment, Build, Question and Learn.
I am a specialist Product and Graphic Design Teacher, specialising in the Iterative process of designing, prototyping and evaluating. With a particular focus on entrepreneurship and making, rooted in real-world contexts and challenges.
My mission is to plan and deliver creative, fun and engaging lessons for KS3, 4 and 5, ages 11-18.
This is a collection of KS3 graphic design lessons that do not require the use of specialist equipment or computers. Allowing the work to be set remotely or to be taught in non-specialist classrooms.
A series of Graphic design lessons, where students are introduced to graphic design, typography and advertising. Projects include:
Brand Yourself
Students design their own logo to brand themselves.
Typography
Students learn about personification in advertising and design their own typography and then posters in the style of the illustrator; Paul Thurlby.
Typography Project:
1
Students are introduced to graphic design, personification and anthropomorphism through various questioning activities and a Pixar based exercise. Students learn how brands use personifciation effectively in advertising (M & M’s and Kellogg’s) before creating their own Pixa research page, demonstrating an understanding of the key words learnt; in a visual way.
2
In this second lesson, students are introduced to graphic design and typography through various questioning activities and videos. They are introduced to the illustrator (Paul Thurlby) and shown how he personifies type for commercial gain; through products and advertising. This then leads to students creating their own artist research page, demonstrating an understanding of the key words learnt; in a visual way.
3
In this third lesson, students are tasked with personifying a letter, so that collectively the class can create a personified typeface. This typeface will then be used in later lessons to form the text for a piece of ‘positive advertising’.
4
In this fourth lesson, students are tasked with personifying type to form the text for a piece of ‘positive advertising’. This is in response to an industry style, client brief by the NHS for their ‘Change 4 Life’ campaign. This lesson could be extended over several lessons.
5
In this fifth lesson, students are tasked with designing a promotional piggy bank. This is in response to an industry style, client brief by Halifax encouraging people save with them. This lesson could be extended over several lessons.
This scheme was designed for KS3 but could also be used with KS4 students.
Logo Design Project:
1
Students are introduced to logo design, their importance/significance, colour psychology, and the design process as a whole. Student then begin to sketch out their initial ideas for their own logo. Lesson consists of starter> class discussions> colour psychology (sorting) task> main task> plenary.
2
Students peer feedback on each others initial ideas and then continue to develop the design for their own logo. Lesson consists of starter> class discussions> peer feedback> main task> plenary.
If you enjoyed this lesson, please see the other lessons of my ‘Brand Yourself’ graphics scheme. This scheme was designed for KS3 but could also be used with KS4 students.
In this lesson, students explore the various needs, wants, interests etc of a target market and how designs can use this information to influence their design decisions, then are given a specific target market to explore through a creative exercise. They then consolidate this information to present their findings to the rest of the class. This lesson can be used for KS3, 4 or 5 in a variety of lessons around the ideas of user-centred design and entrepreneurship.
The only materials required are large sheets of paper and marker pens. Also included are 2 students examples.
In this conceptual project, students are given a brief and apply their learning through the design and presentation of an artifact. Students love the challenge of speculating on the future and forming their concepts around a narrative. There have been some fascinating outcomes as students relish the creative freedom.
Speculative design is designing from a critical, political and/or ethical perspective in the form of an artifact from the near or distant future. There are several reasons why we might use speculative design:
To question and critique.
Raise awareness.
Start conversations.
Provoke, amuse or annoy.
The word ‘artifact’ is deliberate as the outcomes does not need to be a physical product. The outcome can be in the form of any 2D, 3D or digital ‘artifact(s)’. For example it could be a guide, a map, packaging etc. Trying to make the future artifact as believable as possible through storytelling.
Project structure:
What is speculative design?
Mind-map tasks
Case study
Imagining the world in 2067 in regards to society, housing, resources, economy, politics, technology, health and environment
Critique Sessions
Prototyping of artifact
Final presentation
The project can help students develop their rapid prototyping, storytelling, critiquing and presenting skills. It has been delivered to both college and university students.
Pupils’ love being creative with this project. Lessons are differentiated with strong cross-curricular (Literacy, Geography, Science) links, whilst requiring very little resources (only paper and product examples). Also Included are diffirenciated resources and student/teacher examples.
In this first lesson, students will be introduced to the iterative product design process. They will be briefly introduced to ‘what makes a good design?’ through Jonny Ive and Dieter Rams’ 10 principles of good design. This leads to a group ‘ranking task’ where they must rank and discuss varying design examples of a hair dryer product.
They will conduct a piece of product analysis using the ACCESS FM system; through group tasks, individual tasks and class-discussions. Leading to a piece of problem analysis to help find a justified improvement or gap in the market place for their own product.
Lesson consists of ranking activity> class discussions>prep task> main task(s). Lesson could be extended over several lessons.
If you enjoyed this lesson, please see the other lessons in my Product Design series/SOW (where the full iterative design process is covered). In this unit, pupils will gain an understanding into what is product design and the creative process of a designer, from existing research/analysis, writing a specification, initial ideas, isometric drawing and CAD modelling.
Pupils’ love being creative with this project. Lessons are differentiated with strong cross-curricular (Literacy, Geography, Science) links, whilst requiring very little resources (only paper and product examples). Also Included are diffirenciated resources and teacher examples.
In this third lesson, students will continue the iterative product design process. Students complete sketching their initial ideas after a warm-up drawing exercise. This then leads to an introduction to isometric drawing techniques through various individual drawing exercises. They then render their own chosen design as a final drawing in an isometric projection.
Lesson consists of literacy starter> class discussions>prep task> main task. Lesson is a double but could be extended over several lessons.
If you enjoyed this lesson, please see the other lessons in my Product Design series/SOW (where the full iterative design process is covered). In this unit, pupils will gain an understanding into what is product design and the creative process of a designer, from existing research/analysis, writing a specification, initial ideas, isometric drawing and CAD modelling.
One of a series of Graphics Personification lessons, where students are introduced to graphic design, typography and advertising.
In this first lesson, students are introduced to graphic design, personification and anthropomorphism through various questioning activities and a Pixar video. Finally they are shown how both are used effectively in advertising (M & M’s and Kellogg’s) before creating their own Pixar research page, demonstrating an understanding of the key words learnt; in a visual way. Also included is an instructional video to aid with delivery of content.
If you enjoyed this lesson, please see the other lessons in my personification graphics scheme. This scheme was designed for KS3 but could also be used with KS4 students.
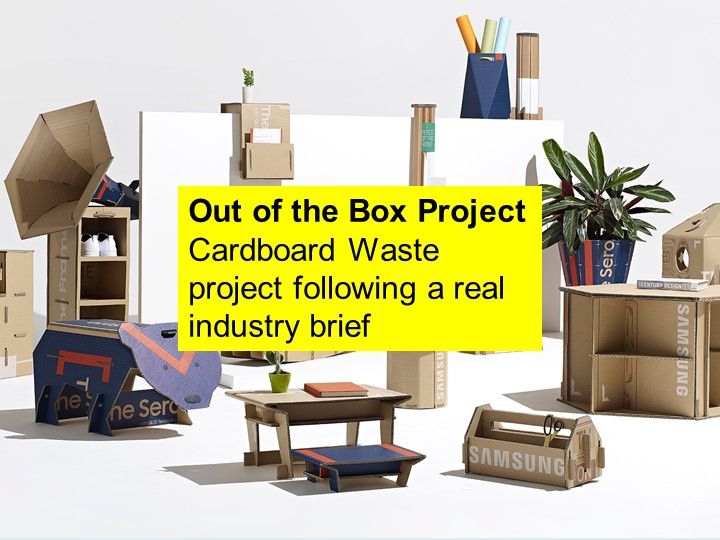
**How can we give waste purpose and value? **In this project, students are given a brief from a TV manufacturer to design a household product out of cardboard waste.
This design project is based on a real industry brief. A global contest that challenged contestants to design innovative new objects for the home that could be made by re-purposing cardboard TV packaging.
Students evidence their design process in a 22 page digital portfolio (Powerpoint) in line with the four assessment criteria. Alternatively this can be printed or used as a template. Included are teacher and student examples. A unit plan is also included.
Lessons cover:
♦ Introduction to cardboard waste and the circular economy - factors and innovative solutions to minimise waste). Why is cardboard waste a growing problem?
♦ Ideation using the SCAMPER technique. Initial sketches worksheet.
♦ Advanced sketching techniques: isometric drawing - Which advanced sketching techniques do designers use? Isometric resource sheets.
♦ Planning and constructing ideas- Would someone else be able to construct my idea? Shape nets resource sheets.
♦ Iterative Design and Prototyping - How and why do we prototype? 2D design and/or physical prototyping. Evaluating our designs.
♦ Creating a Guide - How would someone else construct my idea?
This project does not require the use of specialist classrooms and cardboard could be substituted with paper and scissors if necessary. This project could also be set as remote learning.
This unit/project is designed for a half-term (6-8 weeks) though can be extended or condensed by modifying the design process and portfolio accordingly.
If you enjoyed this project/scheme of work please leave a review and visit my shop where there is a range of creative and engaging design and engineering projects.
–
↠ Projects work in Powerpoint or Google slides. This file may be zipped. Once downloaded right-click the file and select ‘extract all’ to open. ↞
✎Please note I am a UK seller and unless otherwise stated the product uses standard English. This should not affect the use of this product in other countries. ✎
♥ After using this product please leave a rating and comment.
♦ If there are any issues with the product please contact me (via the Ask a Question tab) before leaving feedback.
How can we design affordable, sustainable solutions that can help people in lower economically developed countries?
In this project, students are given a brief from the UN to design a sustainable, solar light for people in developing economies, that have limited or no access to electricity.
Statement of inquiry: Considering the interconnection of global infrastructures creates a more equal and sustainable future for our shared planet.
Students are taught a range of creative, STEAM, and research skills using both digital and physical techniques, evidencing their design process through a 23-page digital portfolio (Powerpoint) in line with the four assessment criteria. Alternatively, this can be printed or used as a template. Included are extension tasks, as well as teacher and student examples.
Lessons cover:
♦ Introduction to LEDCs and the environment - historical factors and innovative solutions to provide sustainable, affordable, off-grid energy sources. What are LEDCs? What might life be like without power? What are the alternatives?
♦ Product Analysis using the ACCESS FM technique.
♦ Ideation using the SCAMPER technique.
♦ Advanced sketching techniques: isometric drawing - Which advanced sketching techniques do designers use? Isometric resource sheets.
♦ CAD Prototyping - Sketchup (free online cloud-based program)
♦ Iterative Design and Prototyping - How and why do we prototype? 2D design and/or physical prototyping. Evaluating our designs.
♦ Making the circuit - Solar Panel, LED, Switch - How do we make working circuits using different components?
♦ Final Prototyping - TinkerCad (free online cloud-based program)
♦ Final Prototyping - 3D printing or Laser Cutting
If you enjoyed this project/scheme of work please leave a review and visit my shop where there is a range of creative and engaging design and engineering projects.
–
↠ Projects work in Powerpoint or Google slides. This file may be zipped. Once downloaded right-click the file and select ‘extract all’ to open. ↞
✎Please note I am a UK seller and unless otherwise stated the product uses standard English. This should not affect the use of this product in other countries. ✎
♥ After using this product please leave a rating and comment.
♦ If there are any issues with the product please contact me (via the Ask a Question tab) before leaving feedback.